概述:
各位未來的前端棟樑你們好,歡迎來到 PWA 系列( 沒錯! 又是我 ),此篇在介紹如何幫自己的 PWA 功能網站添加「推播功能」,那就讓我們開始開始內捲吧 ! 補充介紹:
流程介紹:
PWA 推播通知是一種讓網頁應用程式能夠向用戶發送即時訊息的技術,即使瀏覽器關閉或用戶不在該網站上也能收到通知 (廢話)。
話不多說,我們直接從上帝視角 ✞ 看看當用戶接收到推播通知時中間發生了甚麼吧!
訂閱流程
- 向用戶索取推播權限
- 生成 VAPID 公鑰
- 使用訂閱推播 API 將 VAPID 給瀏覽器,瀏覽器返回
PushSubscription訂閱物件 PushSubscription訂閱物件發送給後端- 後端將該物件存儲
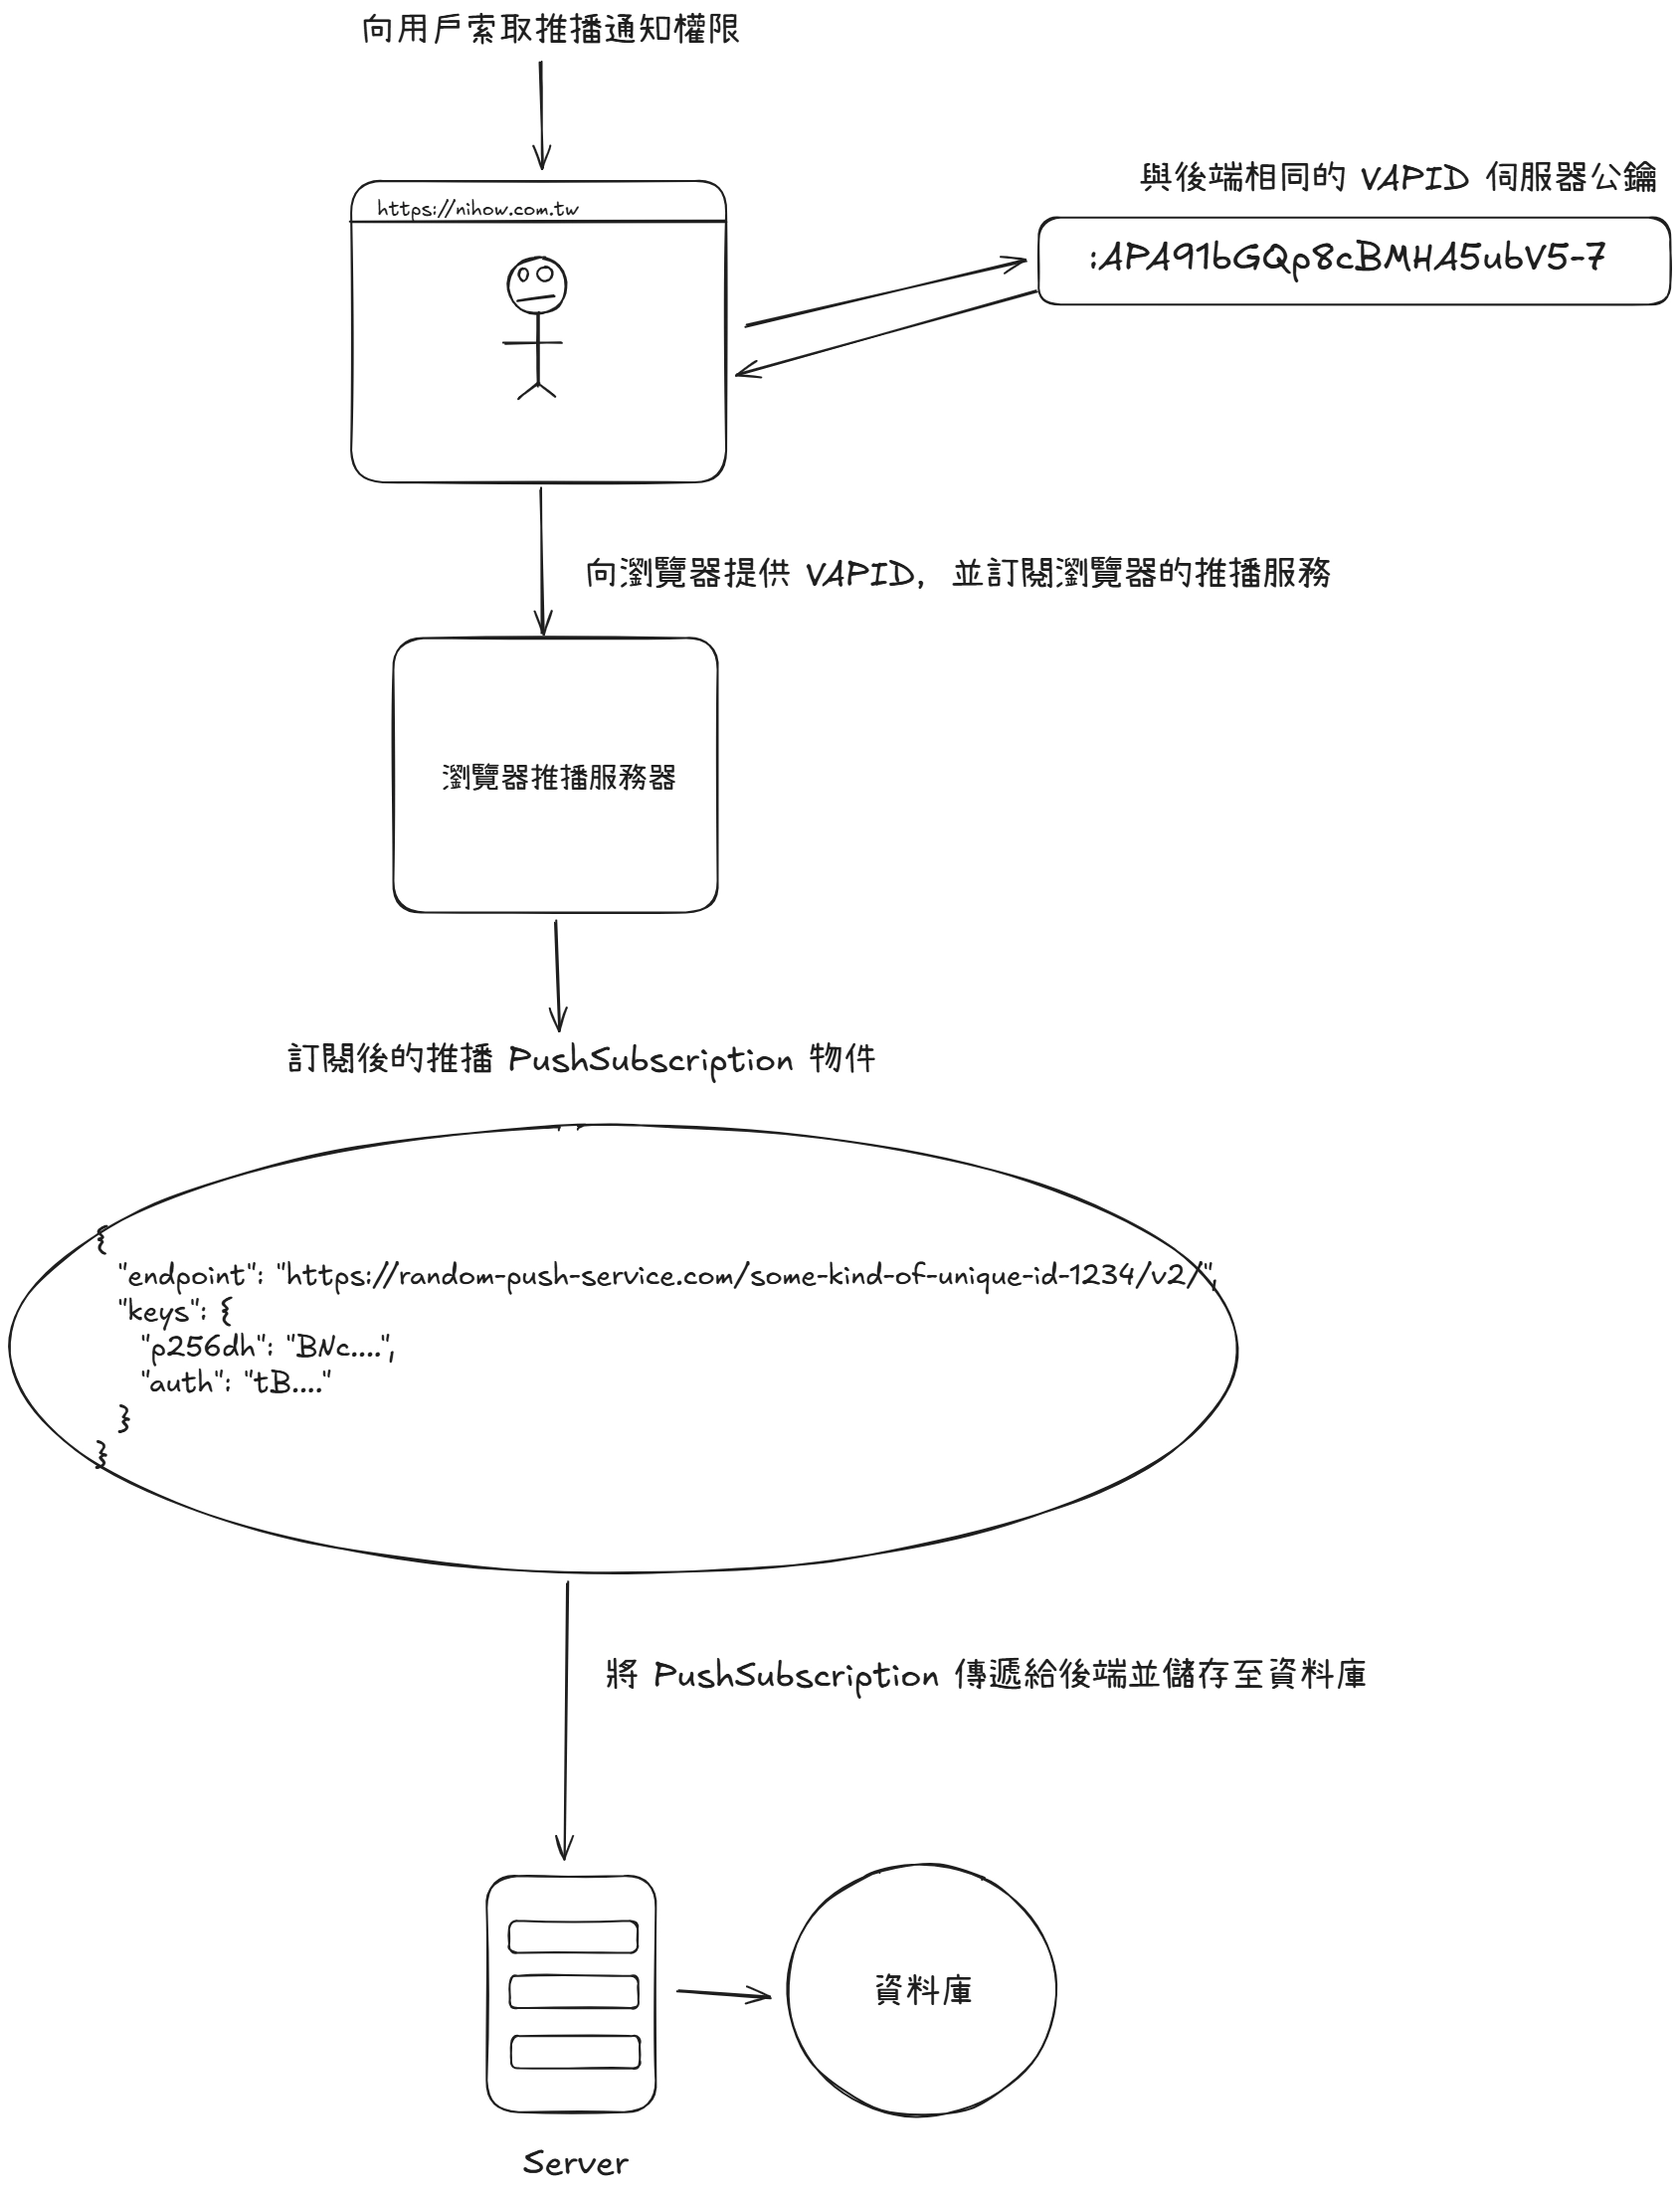
推播流程
- 往後端打推播 API 端點
- 往資料庫取得剛剛存儲的
PushSubscription物件 - 透過
Web push protocol(白話點就是透過套件像 web-push) 往瀏覽器的推播服務發送推播內容 瀏覽器的推播服務解析並確保內容正常瀏覽器的推播服務在向該網站推送消息- 該網站的
Service worker監聽到推播事件,再向用戶推送消息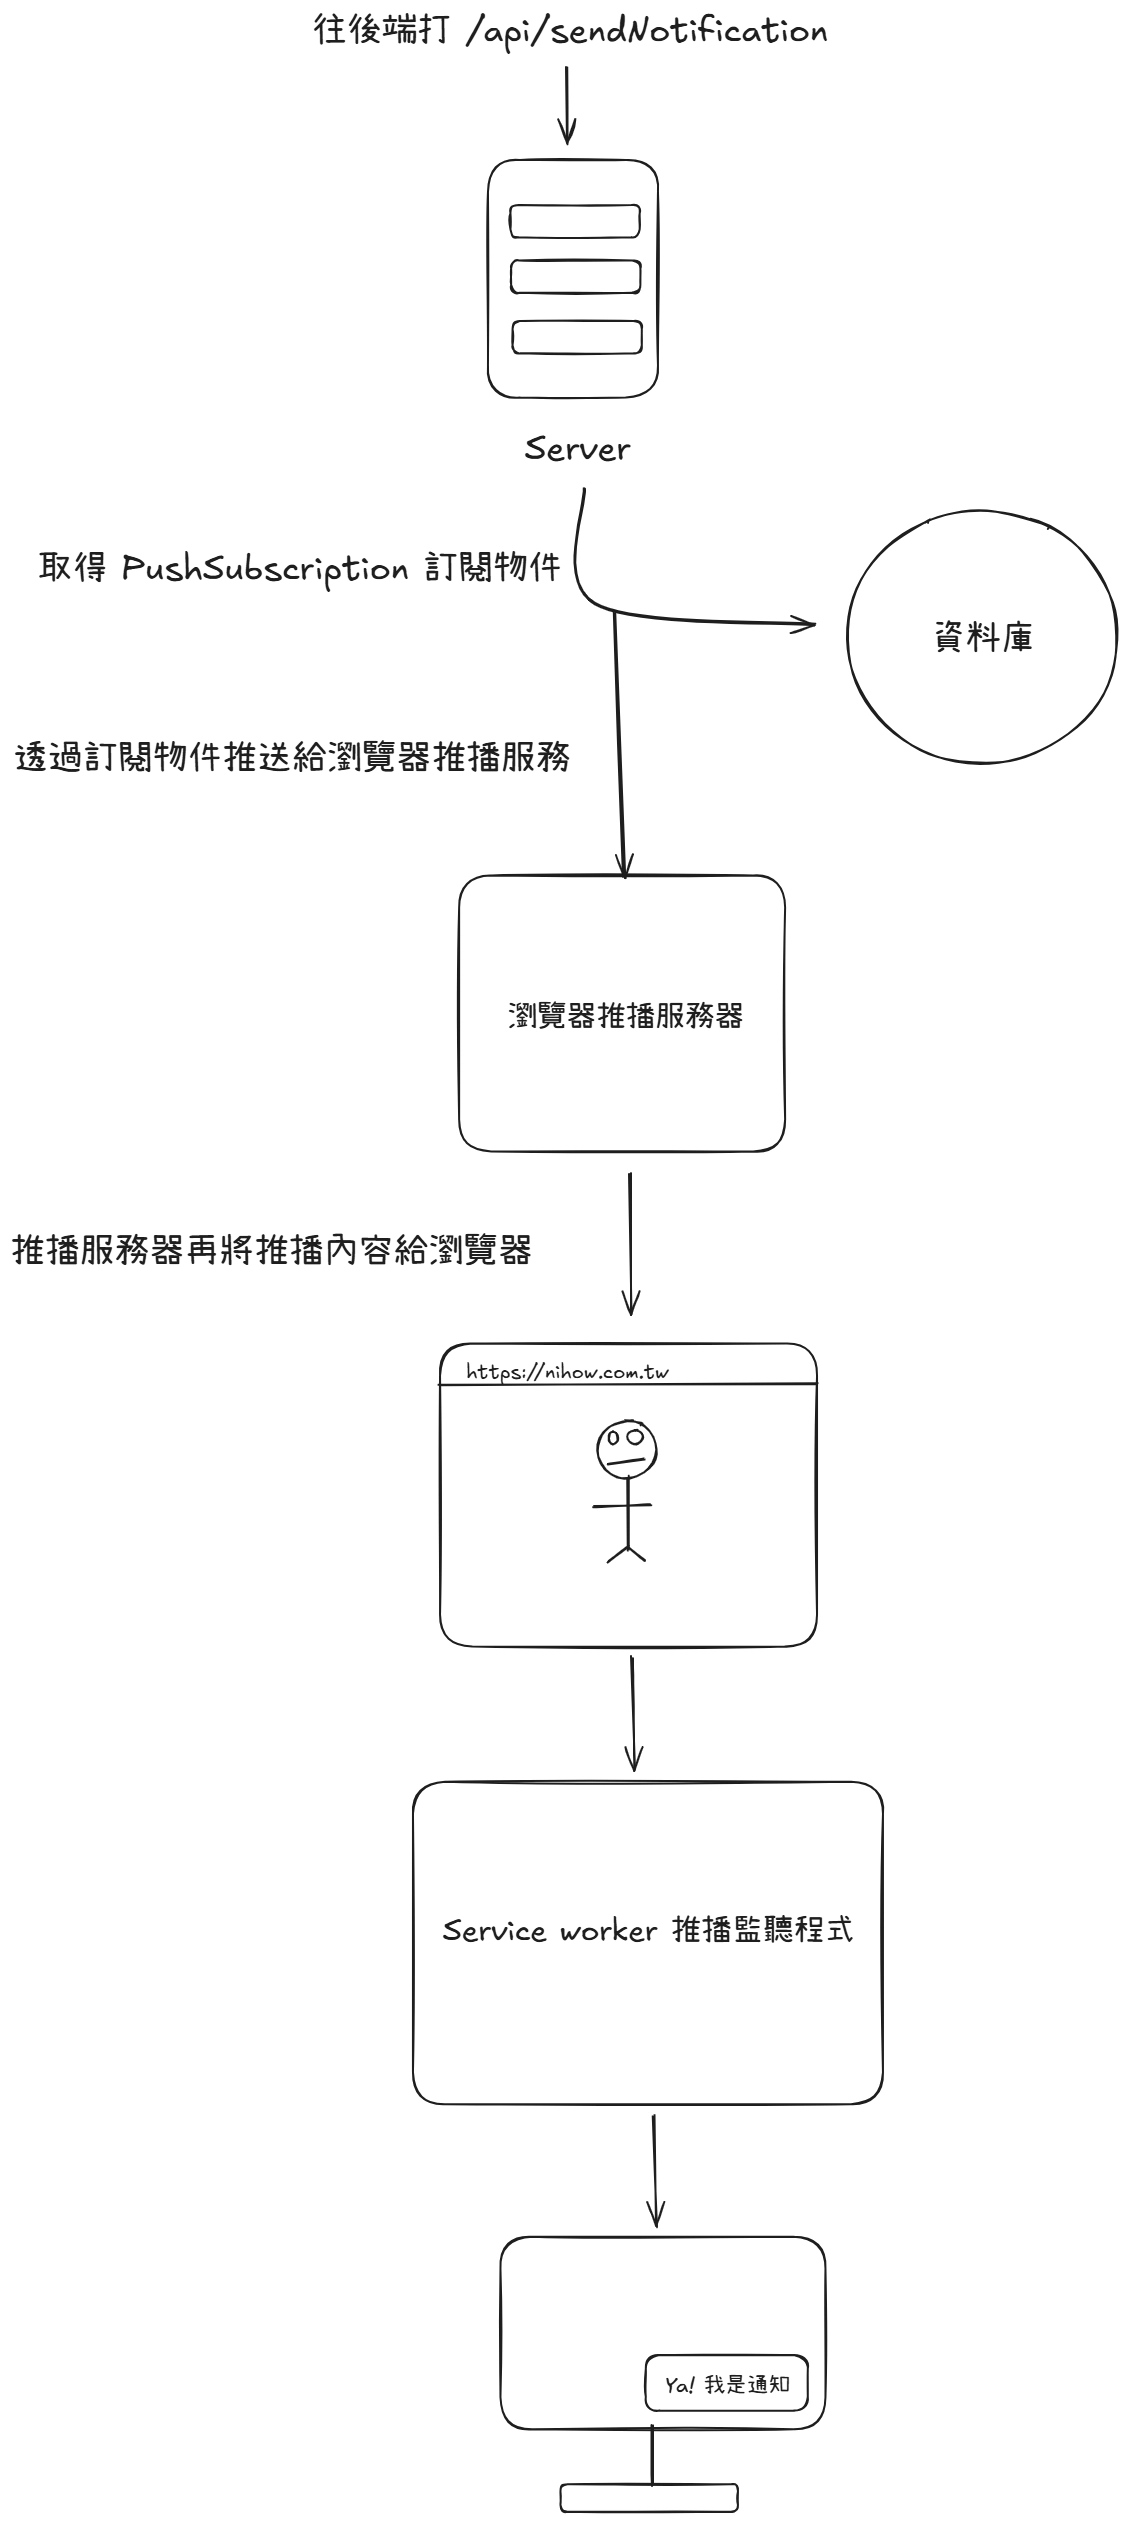 參考來源:web.dev 推送功能的運作方式
補充介紹
PushSubscription: 來自 Push API 的 pushManager.subscribe 方法,生成後會伴隨著公鑰用於推送通知之間的加密工作,且包含向該使用者傳送推播訊息所需的所有資訊。您可以將這個 ID 視為使用者裝置的 ID。 參考來源 : MDN PushSubscription https://developer.mozilla.org/en-US/docs/Web/API/PushSubscription -endpoint: 瀏覽器自己的瀏覽器的推播服務。-p256dh: 客戶端生成的公鑰,用於加密推播內容,確保只有訂閱者的瀏覽器能解密訊息。-auth: 認證簽章,用於驗證訊息確實來自授權的伺服器,確保內文沒被竄改。VAPID 公鑰: 用戶訂閱推播時要向瀏覽器提供的公鑰,伺服器專屬的公鑰(比喻像是身份證名)。可讓推播服務得知哪個應用程式伺服器訂閱了使用者,並確保是同一個伺服器觸發傳送推播訊息給該使用者,讓推播服務知道「只接受來自擁有對應私鑰的伺服器的推播」。[ 參考來源 : Mozila Blog : Sending VAPID identified WebPush Notifications via Mozilla’s Push Service https://blog.mozilla.org/services/2016/08/23/sending-vapid-identified-webpush-notifications-via-mozillas-push-service/瀏覽器的推播服務: 每個瀏覽器都可以使用任何推播服務。這並非問題,因為每個推播服務都會預期相同的 API 呼叫。也就是說,各家瀏覽器會使用自己的推播服務,但都會符合 W3C 推播協定,所以開發者無須關注推播服務是誰。- Chrome / Edge (Chromium) 使用 FCM (Firebase Cloud Messaging) - https://fcm.googleapis.com/fcm/send/...
- Firefox 使用 Mozilla Push Service - https://updates.push.services.mozilla.com/...
- Safari 使用 Apple Push Notification Service (APNs) - https://web.push.apple.com/...
使用教學:
前端篇
Step 1 在 Service worker 先撰寫好推播邏輯 (因為 Push API 只作用於該內部。想想看,如果推播事件放在 Main thread 會發生什麼事情 :) )。
// 推播通知處理
self.addEventListener('push', function (event) {
  console.log('收到推播訊息', event);

  let notificationData = {
    title: '新通知',
    body: '您有新的推播訊息!',
    icon: '/tnrentalweb/images/icon.png',
    image: null,
  };

  // 接收到推播服務訊息
  if (event.data) {
    try {
      const data = event.data.json();
      notificationData = {
        title: data.title || notificationData.title, // 標題
        body: data.body || notificationData.body, // 內文
        icon: data.icon || notificationData.icon, // 訊息小圖示
        image: data.image || notificationData.image, // 內文縮圖
      };
    } catch (e) {
      console.error('無法解析推播數據:', e);
    }
  }

  //  再透過 self.registration.showNotification 向用戶展示訊息
  event.waitUntil(
    self.registration.showNotification(notificationData.title, {
      body: notificationData.body,
      icon: notificationData.icon,
      badge: '/tnrentalweb/images/128_128.png', // 當收到的推播訊息在裝置上顯示的空間不夠時就會使用該圖示
      image: notificationData.image,
      vibrate: [200, 100, 200],
      renotify: true,
    }),
  );
});

// 定義當點擊通知訊息時事件
self.addEventListener('notificationclick', function (event) {
  console.log('推播通知被點擊!');

  //  關閉通知
  event.notification.close();

  /**
   * 當使用者點擊推播通知時,會嘗試喚醒已開啟的網頁分頁,如果沒有則開啟新分頁。
   * type: "window": 只尋找瀏覽器視窗(不包括 Web Workers)
   * includeUncontrolled: true: 包含不受此 SW 控制的視窗
   * */
  event.waitUntil(
    clients
      .matchAll({ type: 'window', includeUncontrolled: true }) // 尋找所有已開啟的視窗

      .then(function (clientList) {
        // 遍歷所有視窗
        for (let client of clientList) {
          if (client.url.includes('/tnrentalweb') && 'focus' in client) {
            // 找到後會直接focus到該視窗分頁
            return client.focus();
          }
        }
        // 沒有找到時,開啟新視窗
        if (clients.openWindow) {
          return clients.openWindow('/tnrentalweb/');
        }
      }),
  );
});
補充
- [ 參考來源 : MDN showNotification() https://developer.mozilla.org/en-US/docs/Web/API/ServiceWorkerRegistration/showNotification
- 推播通知圖示
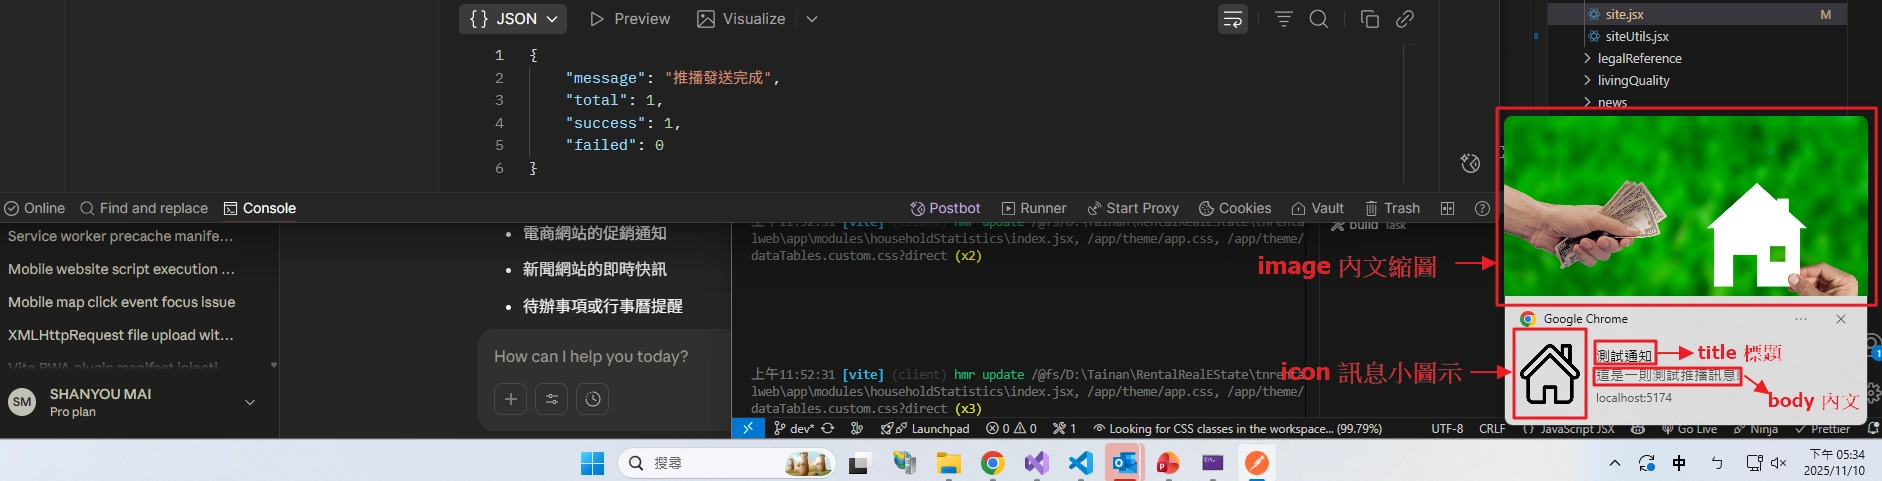
Step 2 使用瀏覽器的Notification.requestPermission向用戶索取推播權限。權限請求與訂閱都應由使用者操作觸發,例如點擊「開啟通知」按鈕;不要在頁面載入時直接執行。
/**
 * 由使用者操作觸發通知權限請求。
 *
 * @returns 通知權限狀態。
 */
async function requestNotificationPermission() {
  const permission = await Notification.requestPermission();

  if (permission !== 'granted') {
    throw new Error('通知權限未被授予');
  }

  return permission;
}
Step 3 開始生成訂閱物件
// 取得 Service worker
const registration = await navigator.serviceWorker.ready;

let subscription = await registration.pushManager.getSubscription();

// 1.檢查是否已經訂閱
if (subscription) return;

// 2.建立新訂閱
const subscribeOptions = {
  userVisibleOnly: true, // 確保每個推播都有可見的通知
  applicationServerKey: urlBase64ToUint8Array(
    'BE3XgfiQ_VVE9CTbwTmY13AXGKp......',
  ), // 與後端相同的 VAPID 公鑰,可以是 base64 或 arrayBuffer
};

// 3.完成推播訂閱,這就是我們的 PushSubscription 物件,裡面包含一個 endpoint 屬性就是我們丟給瀏覽器的 applicationServerKey 後所生成的 PushSubscription 裡面包含相關訂閱描述,用於辨識該用戶
subscription = await registration.pushManager.subscribe(subscribeOptions);

/**
 * 轉換 base64 至 unit8Array
 * */
function urlBase64ToUint8Array(base64String) {
  const padding = '='.repeat((4 - (base64String.length % 4)) % 4);
  const base64 = (base64String + padding).replace(/-/g, '+').replace(/_/g, '/');

  const rawData = window.atob(base64);
  const outputArray = new Uint8Array(rawData.length);

  for (let i = 0; i < rawData.length; ++i) {
    outputArray[i] = rawData.charCodeAt(i);
  }
  return outputArray;
}
Step 4 發送訂閱物件至後端。
await fetch('http://localhost:3000/api/subscribe', {
  method: 'POST',
  headers: {
    'Content-Type': 'application/json',
  },
  body: JSON.stringify(subscription),
});
後端篇
import express from 'express';
import bodyParser from 'body-parser';
import cors from 'cors';
// 1. 引用 webpush
import webpush from 'web-push';
const app = express();

app.use(
  cors({
    origin: 'https://your-frontend.example.com',
    methods: ['GET', 'POST', 'PUT', 'DELETE', 'OPTIONS'],
    allowedHeaders: ['Content-Type', 'Authorization'],
    credentials: false,
  }),
);

app.use(bodyParser.json());

// 2. VAPID 相關設定 (替換成你生成的 keys)
const vapidKeys = {
  publicKey: 'BE3XgfiQ_VVE9CTbw...',
  privateKey: '2dp6d82KYNzMSqV...', // 從 webpush.generateVAPIDKeys() 取得。
  //   !注意! : VAPID key 只可生成一次
};

// 3. 配置 VAPID 內容,後續的推送都會一併使用該配置
webpush.setVapidDetails(
  'mailto:nihow@wfusion.com.tw', // 你的聯絡 email
  vapidKeys.publicKey,
  vapidKeys.privateKey,
);

// 4. 儲存訂閱資料 (實際應用中應該用資料庫)
let subscriptions = [];

// 5. 推播訂閱 API endpoint
app.post('/api/subscribe', (req, res) => {
  const subscription = req.body;

  console.log('收到新訂閱:', subscription);

  // 檢查是否已存在
  const exists = subscriptions.some(
    (sub) => sub.endpoint === subscription.endpoint,
  );

  if (!exists) {
    subscriptions.push(subscription);
    console.log('訂閱已儲存,目前共', subscriptions.length, '個訂閱');
  }

  res.status(201).json({ message: '訂閱成功' });
});

// 6. 發送推播給所有訂閱者
app.post('/api/send-notification', async (req, res) => {
  const { title, body, icon, data, image } = req.body;

  const notificationPayload = JSON.stringify({
    title: '新通知',
    body: '您有新的更新!',
    icon: '/tnrentalweb/images/icon.png',
    data: {},
    image: null,
  });

  console.log('準備發送推播給', subscriptions.length, '個訂閱者');

  // 遍立我們剛剛接收到的訂閱陣列,並推送消息
  const results = await Promise.allSettled(
    subscriptions.map(async (subscription, index) => {
      try {
        // 推送消息
        await webpush.sendNotification(subscription, notificationPayload);
        console.log(`推播成功發送給訂閱者`);
        return { success: true, subscription };
      } catch (error) {
        console.error(`推播失敗`, error.message);

        // 如果訂閱已過期或無效,移除它
        if (error.statusCode === 410 || error.statusCode === 404) {
          console.log('移除無效訂閱');
          subscriptions = subscriptions.filter(
            (sub) => sub.endpoint !== subscription.endpoint,
          );
        }

        return { success: false, error: error.message };
      }
    }),
  );

  // 成功、失敗計數
  const successCount = results.filter((r) => r.value?.success).length;
  const failCount = results.length - successCount;

  res.json({
    message: '推播發送完成',
    total: results.length,
    success: successCount,
    failed: failCount,
  });
});

const PORT = 3000;
app.listen(PORT, () => {
  console.log(`推播服務運行於 port ${PORT}`);
});
支援度:
Notification API : https://caniuse.com/notifications Push API : https://caniuse.com/?search=Push